Year of the Pig…Pom

Happy Lunar New Year!

2019 is the Year of the Pig in the Chinese zodiac, so to celebrate I made myself a cute pig pompom! Or as I like to call it….a Pig Pom.

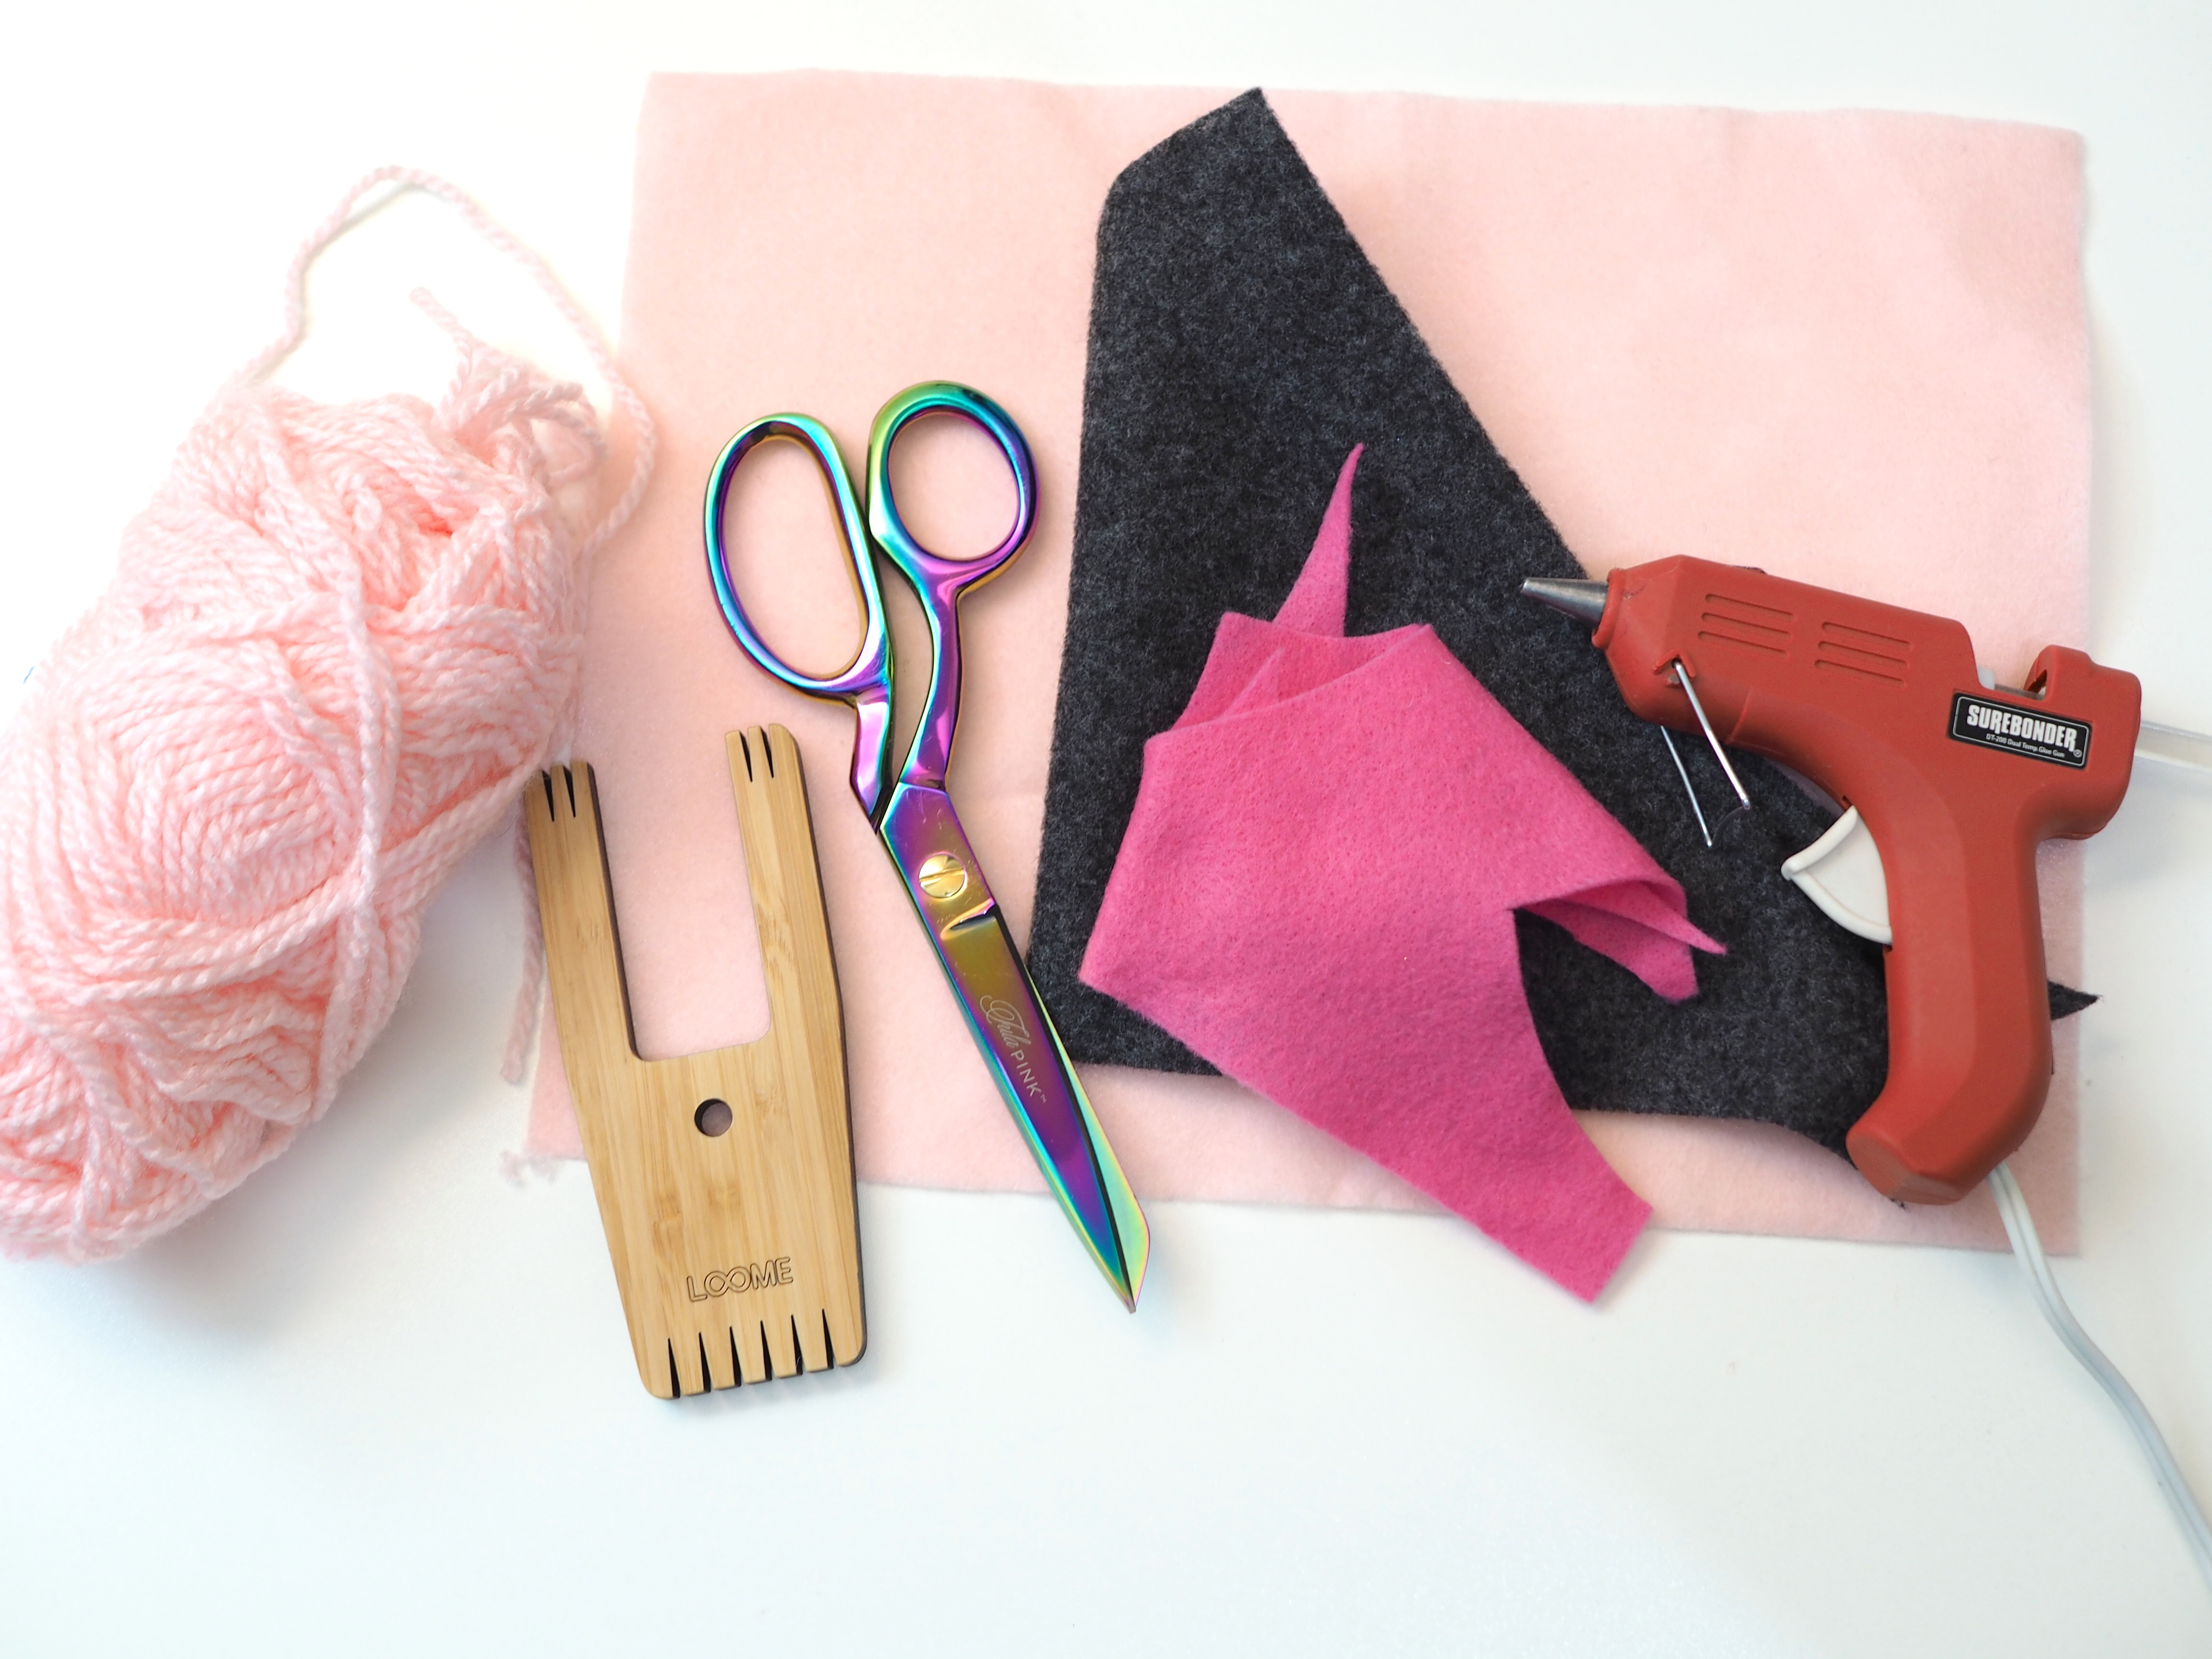
I’m happy to report that I made this project using only items in my stash, so it doesn’t require too many supplies:

  • Pink Yarn
  • Preferred Pompom making tool (I used Loome)
  • Pink felt (2 tones if possible)
  • Black felt (I used grey)
  • Scissors
  • Hot glue gun or craft glue
  • Tapestry needle (optional)

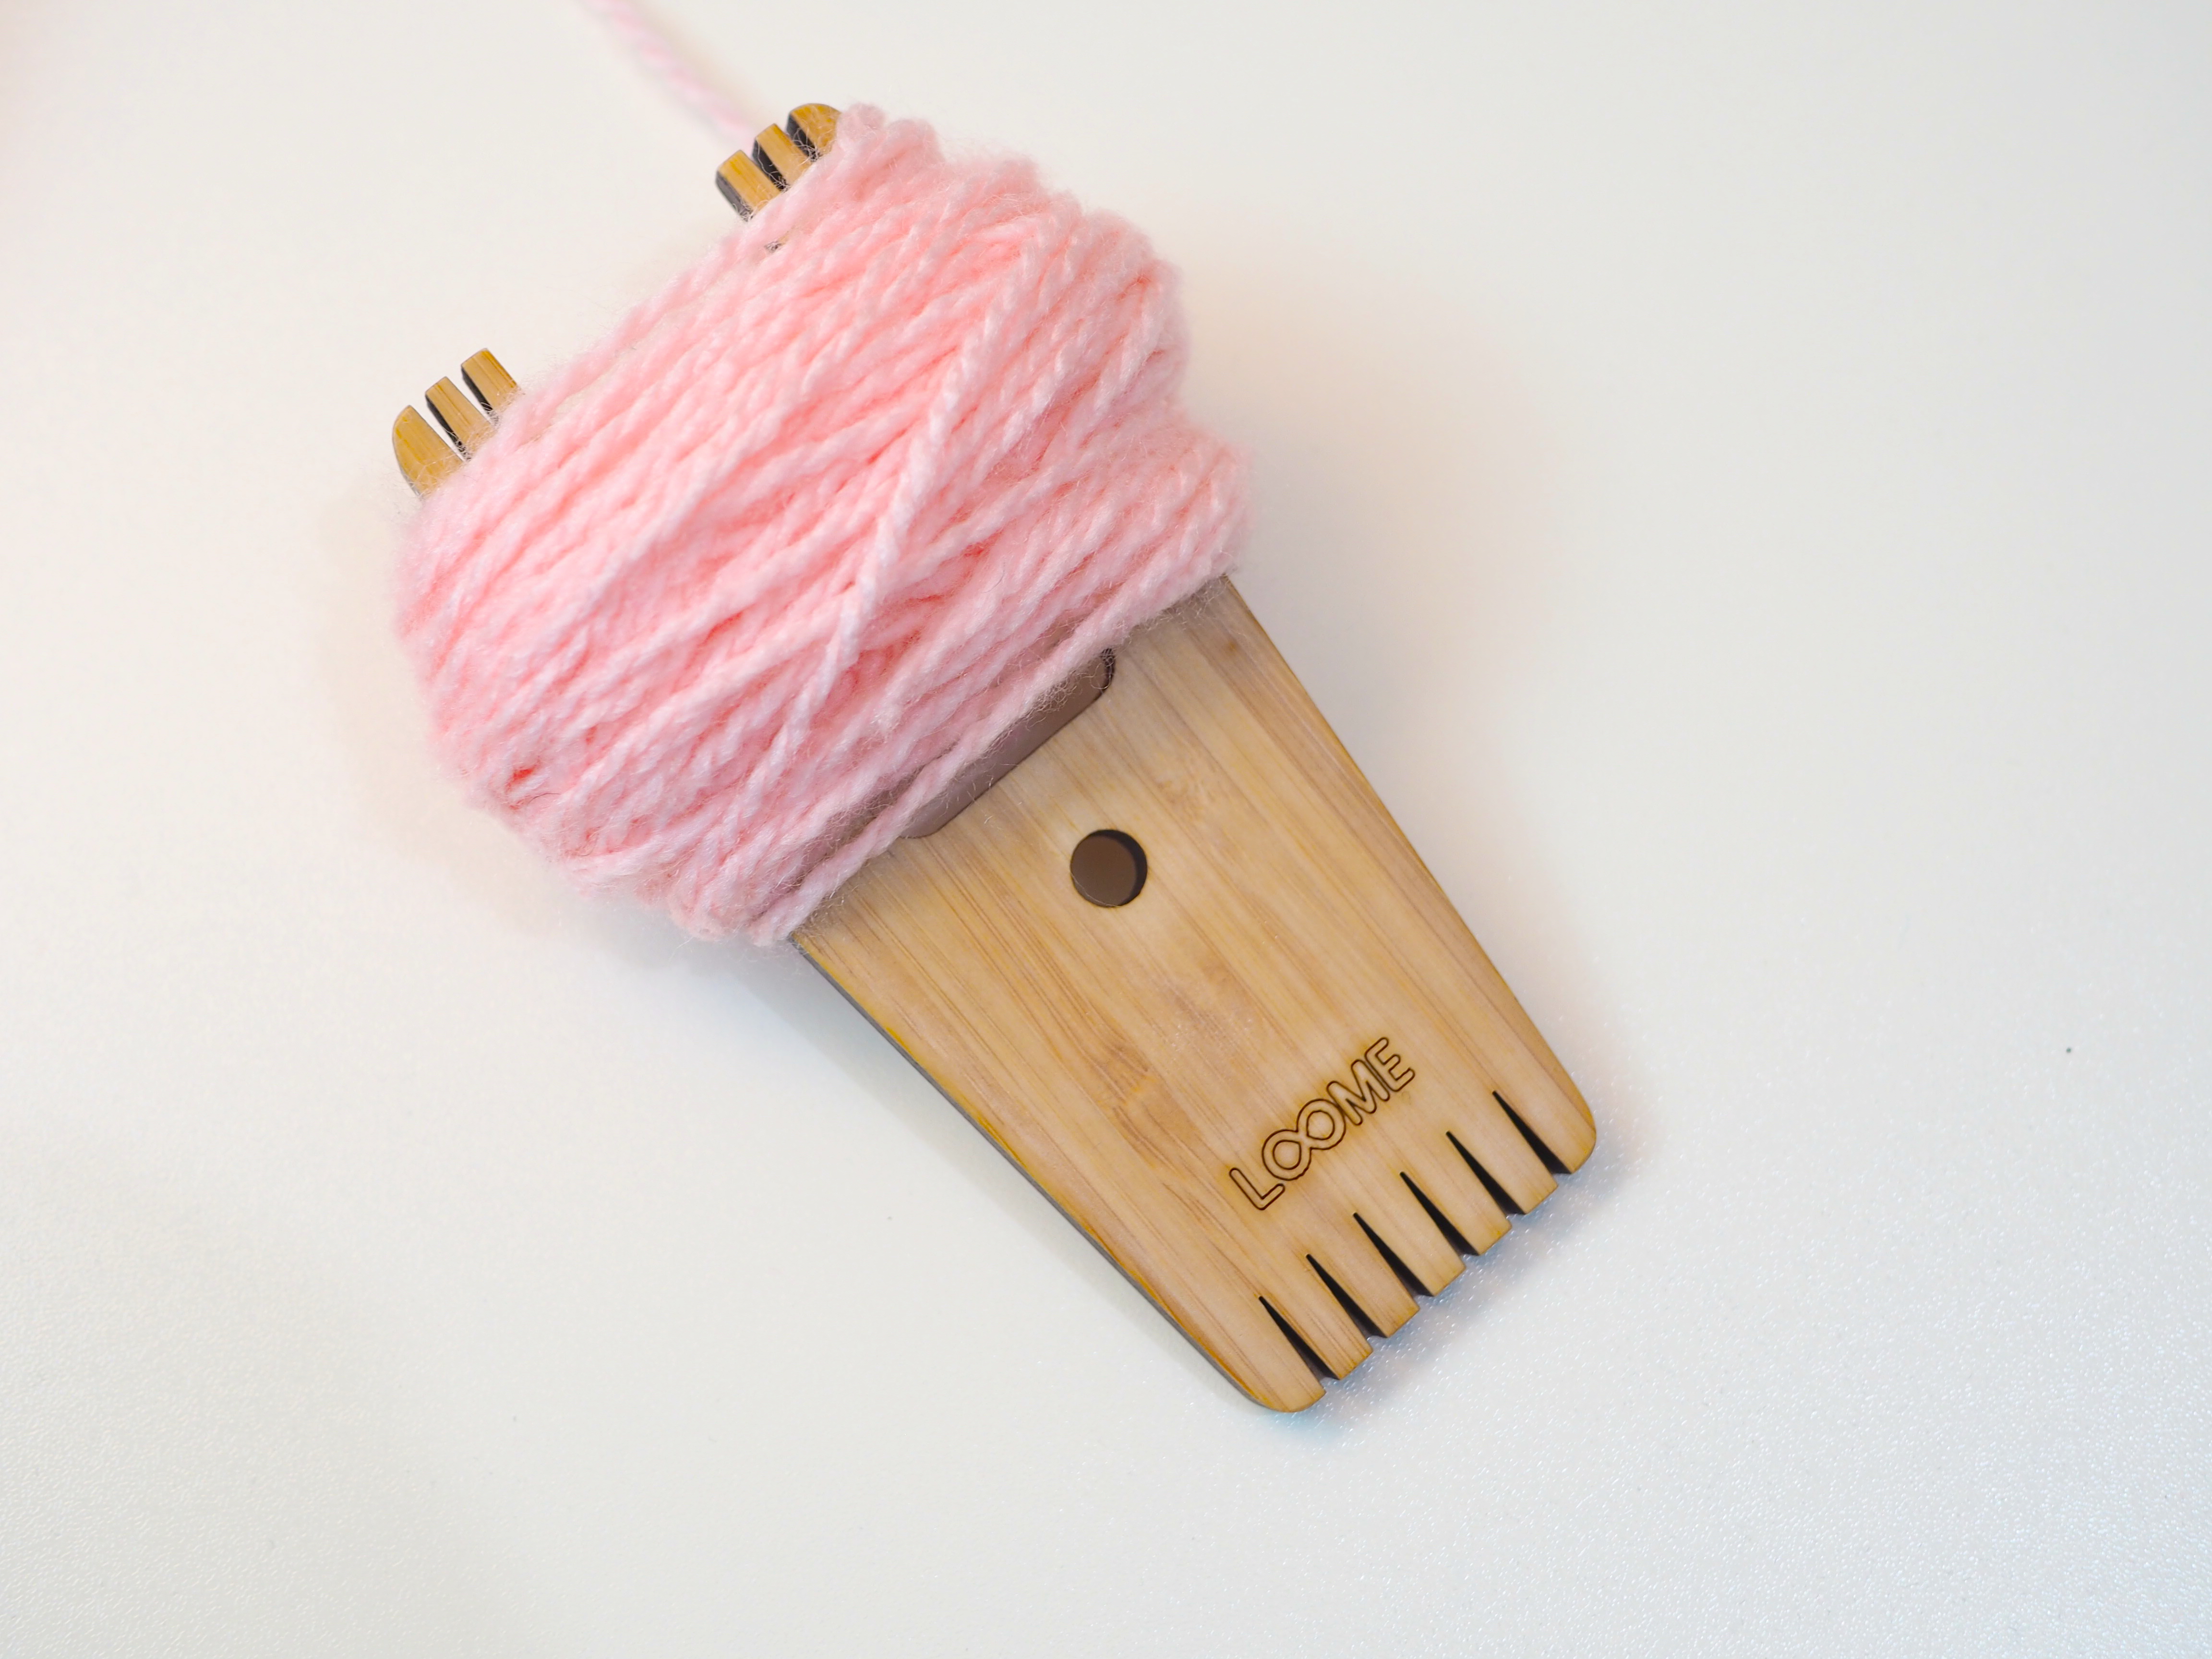
Step 1: Make your pompom!

There are quite a few ways you can make a pompom, all of which involve winding your yarn around a tool, tying all of it together with string, cutting the loops open, and then trimming down to resemble a sphere.

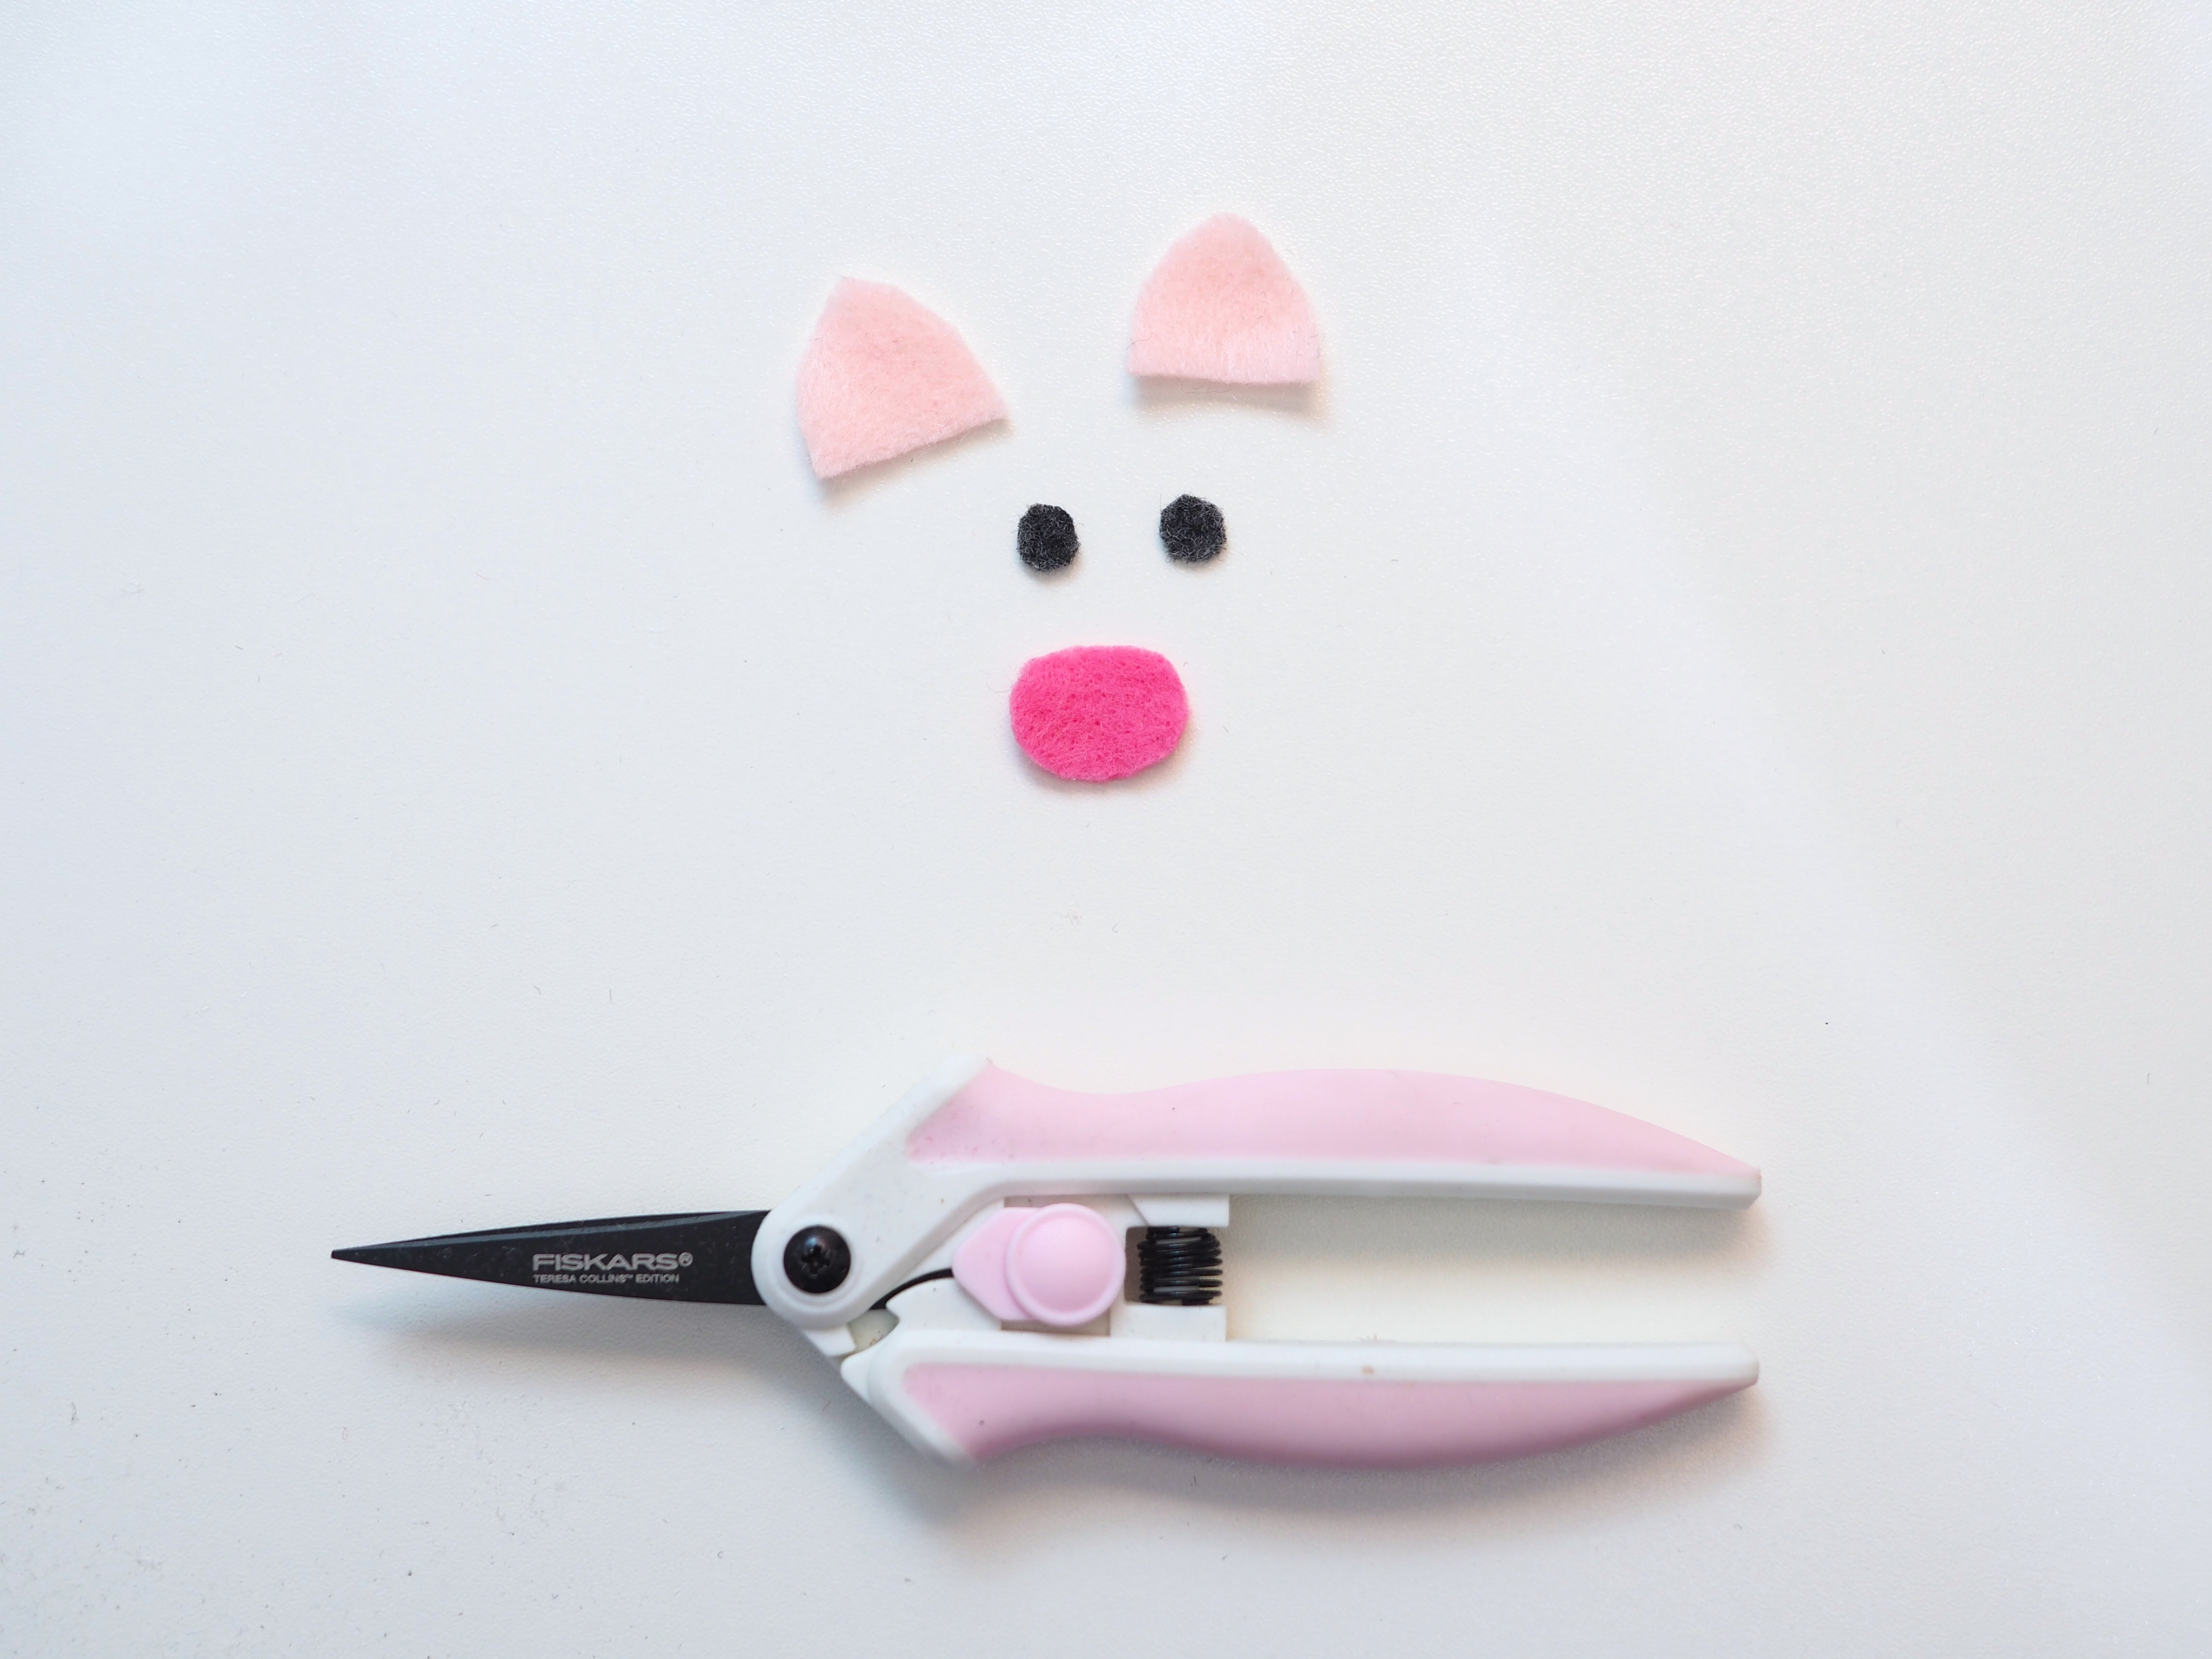
Step 2: Create the face.

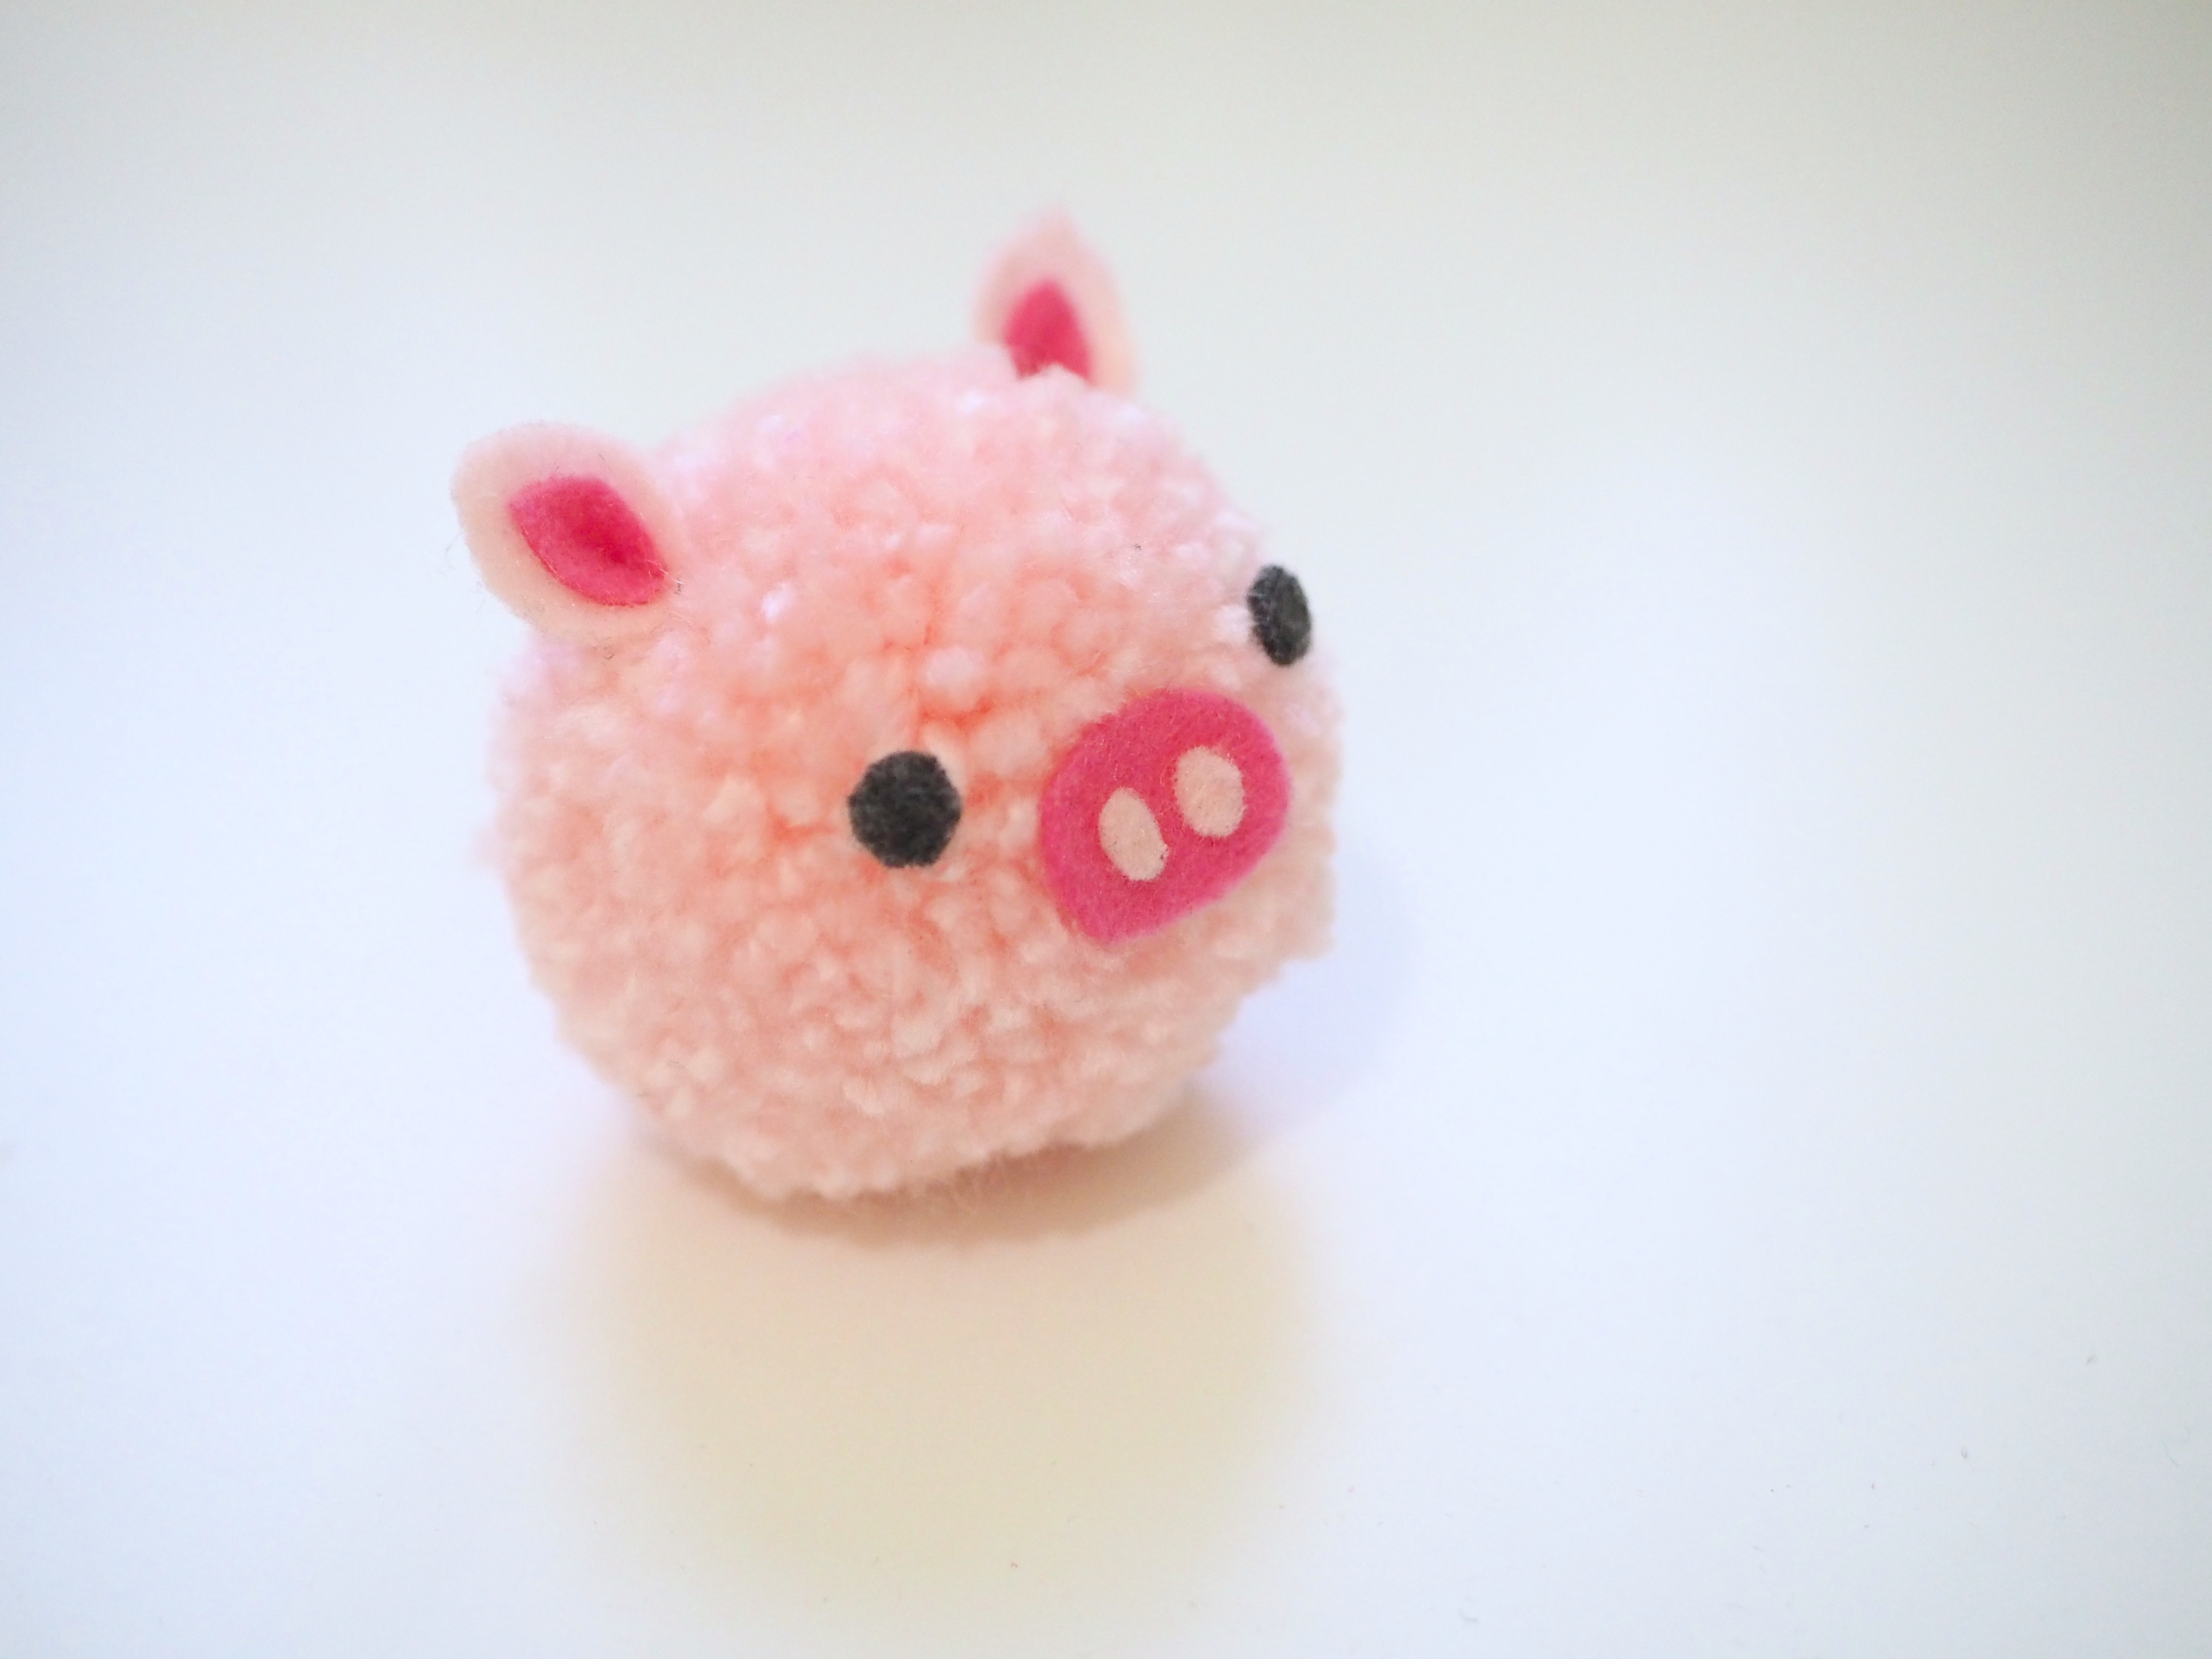
You really only need a tiny bit of felt, so if you have scraps this is the perfect project! To make the ears you start with the light pink felt and make a general triangle shape, curving the sides to resemble a pig ear. You will make the same shape, but smaller, with the darker pink felt for the inner ear.

For the snout use the darker pink felt to make an elongated circle, or you can start with a rectangle and round out the corners. Then you take the light pink felt and make two small ovals. The eyes will be two small circles in either black or charcoal felt.

This only shows the first layer and not the inner layer of the ears or the nostrils on the snout. I also used fine tip scissors to facilitate cutting out the smaller shapes.

Step 3: Layer the dark and light pink pieces.

Take the small pink ovals and glue them to the dark pink snout and let dry. For the ears you’ll want to take the inner/dark pink part and glue them to the larger/lighter pink pieces. After they dry, place a dab of glue on the bottom border and pinch closed to create the 3D ear shape.

Step 4: Glue them onto your Pig Pom!

NOTE: if you want to be able to hang your pompom on something, do this BEFORE gluing the face on! This is where the optional tapestry needle comes in handy. Take some yarn or string, and with the needle you will slowly take it through the body of the pompom and back out. Make sure you do this slowly so that you don’t pull out any strings from the pompom.

You can use your Pig Pom as a charm to hang on your door, as a keychain, on a headband or pin, or just to sit on your desk as you enjoy this Year of the Pig!

Craft With Your Stash Challenge

Towards the end of 2018 Jen from Craftic announced a new challenge….#CraftWithYourStash. For 2019, Jen pledged she would not purchase ANY new crafting supplies. ANY! Was she delirious? Maybe dehydrated? She can’t be serious, right?

It took for me to start digging into my craft room to realize maybe it was time I did the same. 1) Because my supplies were overflowing to the point that it was hard to navigate the room (hoarders style), and 2) because I had no idea what was hiding at the bottom of those piles. So for the past few weeks I put aside any sewing or crafting and started working away at the piles.

I discovered craft kits I didn’t realize I had, tools that (let’s be honest) I was never going to use, dozens of magazines I had never read, and fleece…..lots, and lots of fleece.

So, in 2019 I won’t be buying new craft supplies. Ok, disclaimer, I AM going to set aside $5 per month that I can spend on minor supplies if I need them to finish a project (gotta be realistic….like if I need a specific kind of glue, or I run out of something critical. NOT fleece.), but other than that, my projects must be made with items from my stash!

Who else will be participating in the #CraftWithYourStash challenge? Let me know in the comments, or share your projects using the hashtag on social media! Happy Crafting!

DIY Spiderweb Earrings

Truth time: I’m not much of a Halloween person. [gasp]

I know, I’m weird. I don’t like horror movies and I don’t care for Halloween parties (sweaty costumes, creepy masks….no thanks) so I’ve never felt a big motivation to spend money on Halloween decor or outfits.

This means that whenever I do dress up, its gonna be DIY, and its going to be cheap! Of course, this project fits that criteria perfectly!

pa270667.jpg

This project is super simple as far as materials go, but a little challenging if you’re new to using a glue gun (or just awkward in general, like me). That being said, the materials are super cheap so its hard to get mad if one comes out wonky!

You will need the following:

  • Glue gun (I found it easier when I used a low temp one)
  • Glue gun sticks (make sure to have a few for practice. You’ll need about 2 for the actual project)
  • Parchment paper
  • Black paint/paint brush
  • Earring findings (I used Hildie & Jo hooks for sensitive ears and matching jump rings)
  • Jewelry tools to open and close the jump rings

Step 1:

Lay out a piece of parchment paper and with the hot glue create a spiderweb. You can either freehand (which is what I prefer), or you can draw the shape you want on the parchment paper and follow it. I found that the “best” looking spiderwebs have 4 intersecting lines.

This is the hardest part of the project. Practice getting an even flow out of the gun, but if you get clumps here and there it just adds to the charm! I find that moving slowly is easier for me, but it may depend on how your gun warms up the glue. Don’t worry about the strings, you can either pull them off later, or leave a few in for a more “webby” look.

Step 2:

Once the glue dries up (should only take a few minutes) take a paint brush and go over your spider web. Do the back part first, let it dry. Flip to the front, and paint.

OLYMPUS DIGITAL CAMERA

Step 3: Attach your hardware and its ready to wear!

PA270665.JPG

Told you it was easy!

I can’t wait to use this technique to make other glue gun crafts!


Bananya Cosplay

If you didn’t believe I was a total dork before now, you will after this post.

You see, I’m somewhat obsessed with Bananya. Don’t know what Bananya is? (You’re not alone.) A bananya is a cat….that lives in a banana. And it has many other Bananya friends (there’s baby bananyas, black bananya, vain bananya, tabby bananya…) Basically, they all live in bananas and they hang out on the kitchen counter when you aren’t watching. The episodes are less than 5 minutes long, so if you have a chance check out a few and come back. Its ok. I’ll wait.

bananya.jpg

Thanks for coming back! Did you fall in love?

My friends know about my obsession, and when discussing potential cosplays for Florida Supercon one of my friends made the suggestion. I’m pretty sure she was joking, but I fell in love with the idea!

The pieces slowly came together in my head:

  • Cat headband (felt ears)
  • Tshirts
  • Yellow fleece pants
  • Yellow and white banana peels

The first item I tackled was the pants. I used Simplicity 2290 as the pattern and only changed the bottom hem by adding elastic to make sure they bunched up.

It took me a little bit longer to decide how to tackle the peels. I knew fleece on its own wouldn’t give me the drape that I wanted, but after a couple of trips to 2 different Joann’s I was able to find the perfect material, 1/2″ thick foam.

OLYMPUS DIGITAL CAMERA

For the peels I did use a tiny bit of math to figure out the width of each (widest waist measurement divided by 4 = Peel width). They are fluffy, so if you fudge the numbers a bit its not a big deal. Once I cut 4 rectangles in width needed, I drew a tapered peel shape and cut it out. I used that as the “pattern” for the remaining peels.

OLYMPUS DIGITAL CAMERA

I used that same pattern to cut out 4 pieces of yellow fleece and 4 pieces of white fleece.

To sew together I layered the fleece pieces on top of the foam (yellow on top, white in the middle, foam on the bottom) and sewed as close to the edge as possible with about 1/4″ seam allowance around the curved parts leaving only the straight bottom section without sewing. Once all 3 layers were sewn I turned it right side out, leaving the yellow fleece on the bottom, and the foam sandwiched in between the fleece layers.

I wanted the option to be able to take off the peels if they became a nuisance (since we’d be wearing them practically the whole day, plus, you know….bathroom breaks…). This also allows the pants to be worn again sans peels. In order to be able to get them on and off relatively easily, I attached them all to some webbing and attached a buckle that allows you to tighten as needed.

OLYMPUS DIGITAL CAMERA

I left the cat ears for last, since they would be fairly easy to make. (For reference, check out my post on making a unicorn headband!) All I needed was 2 headbands, which I already had, and some felt in black, pink, and white.

OLYMPUS DIGITAL CAMERA

I’m pretty darned happy with how this costume turned out, and that’s saying a lot! I tend to be very critical and tell myself everything looks like crap if it isn’t perfect. It wasn’t perfect, but I still loved it!

CANANA (33 of 69) copy

A Bananya in its natural habitat.

CANANA (60 of 69) copy

CANANA (35 of 69) copy

A big thanks to Will for indulging me and taking these pictures during a random trip to Fairchild Tropical Garden. (And yes, those are banana trees I’m sneaking behind!)


Air Plant Himmeli

In case you haven’t heard, plastic straws are OUT. Metal and reusable straws are totally IN*.

So what do you do when you have bags of straws at home, but you feel like a monster using them to sip on your Fresca, but you also don’t want to throw them out for fear they’ll end up in an innocent turtle’s nose?!

You use them for crafting, duh. More specifically, you use them to make himmeli! And in case merely up-cycling straws is not green enough for you, these himmeli will serve as a perfect outdoor-safe home for your air plants! (Because air plants are totally in too.)

Air Plant Himmeli Finished.JPG

There are two basic ways to make these himmeli: 1) make all the straws the same size to get a cute chubby symmetrical shape, or 2) use longer straws at the top to make an elongated shape. In the steps below I’ll show you how to make the chubby one, and in the last step I’ll explain how to make the changes to make yourself an elongated himmeli!

So, ready to make some himmeli?!

Himmeli supplies

Materials:

  • Straws. Thickness depends on the style you’re going for or what you have at home. I used smoothie straws from Ikea, because that’s what I had on hand.
  • String. Cotton, nylon, pretty much anything will do. (If you use skinnier straws or thicker string, you may need a tapestry needle.)
  • Scissors.
  •  A ruler. (Very much optional.)

Step 1: Figure out how big you want your himmeli! You want to make it slightly larger than your airplant so it has room to grow, but not too big that it falls out. (You can either use the ruler to get your measurement, or you can eyeball it and use the first straw as the measurement for the others.)

Step 2: Cut out 12 straws segments. Either all the same size, or 3 sizes: 4 for the top, 4 for the middle, 4 for the bottom. (For maximum mischief, only hold one end of the straw while you’re cutting. Kids and pets will LOVE this.) 

Step 3: Cut your string. The math-free way to figure out how much string you need? Line up your longest 4 pieces. Take the string, and measure out that length 4 times. (If you’re using a cotton string or twine, it will help to wrap the ends in tape so they don’t unravel!)

Step 4: Measure out a string length equivalent to 2 straw pieces. (This is going to be your tail, don’t let it go anywhere). Take 3 pieces and string them, then tie a knot at the top (keep that tail in tact!)


P2271662.JPG

Step 6: Next, string 2 more straw pieces, and tie a knot at the bottom this time.

P2271663.JPG

Step 7: Keep repeating this (string 2, tie, string 2, tie), alternating the side that you’re tying, until you’re left with 1 lonely straw piece on the string.

OLYMPUS DIGITAL CAMERA

Step 8: Grab the 2 tails that are left, and tie them together.

Step 9: You’re going to be left with a pyramid with 2 hanging flaps. Take both of the tails and string them through one of the “straw flaps” so they come out the other end.

P2271668 copy.jpg

Tie them around the other flap. And that’s it!

OLYMPUS DIGITAL CAMERA

Left: Chubby Himmeli; Right: Elongated Himmeli

Now, to make an elongated himmeli you are going to substitute the 1st 2 straws and the last pair (not the last lonely straw) with longer pieces. Like so….

P2271674.JPG

And the last few steps are the same!

Finally, place your air plants in their new home….they (and the turtles) will thank you for it!

air plant himmeli 2 .JPG

OLYMPUS DIGITAL CAMERA

*For those who are worried about HOW CAN I DRINK MY BUBBLE TEA WITHOUT BEING A MONSTER, Pretty Candy Pin Co carries some gorgeous Rainbow Stainless Steel Boba Staws! (Edit: Currently sold out, but they should be in stock in a couple of weeks.)

Craftcation 2018 Recap

I’m sure the world is wondering… “Sabrina, how was Craftcation? Was it really as good attending the 2nd time around?”

The Answer: YES! Returning to Craftcation as an alum was a very different experience than going as a first timer, but it is just as magical, energizing, and inspirational as the first time. Its now been 2 months since I returned from the conference, and I still get warm fuzzies thinking back to those 4 days.

OLYMPUS DIGITAL CAMERA

OLYMPUS DIGITAL CAMERA

To refresh your memory on what I’m talking about, you can check out my post about last year’s experience here.

Here are a few things I did differently this year:

  • I was an ambassador! Dear Handmade Life takes applications every year for ambassadors, basically those of us who CANNOT shut up about Craftcation. I was SO honored to be selected. The cherry on top was being gifted an ADDITIONAL swag bag upon check in. It was pretty epic.
  • I took more business classes than crafting classes. I know, I know, it sounds crazy! But there are SO MANY accomplished and successful presenters that teach every year, and I found myself not being able to resist the business sessions.
  • I rented a car. The train was a fun adventure last year, and there’s always a shuttle for those who didn’t bring a car, but I wanted a little more flexibility this time around. I’m so glad I did! I got to do some fabric shopping in LA the day I arrived and some sightseeing on my last day there. (I also lost my phone on the Rental Car Shuttle, but that’s a whole other story…)
  • I skipped class. But to be fair, they recommend you skip a class or two! Last year I scheduled something for EVERY session, but this year I consciously scheduled in a few open slots. I used that time to go to the beach one morning, to make the obligatory trip to Superbuzzy for fabric shopping, and to check out a few breweries.

OLYMPUS DIGITAL CAMERA

Beer Flight at Topa Topa Brewing. Succulent centerpieces were on point.

Some other highlights (since I seem to be sticking to last year’s post format…) :

  • Laughing and crying (simultaneously) at the Bust Through Imposter Syndrome panel.
  • Experiencing my very first Earthquake! We were in the middle of our Etsy Think Tank when the room started vibrating vigorously. Luckily I was in a room full of West Coasters who knew what was going on.
  • Spotting a Tsunami warning sign the next day at the beach. (If I’d seen it before the earthquake I’d have been a nervous wreck!)

OLYMPUS DIGITAL CAMERA

Don’t worry. She’s not running away from a tsunami.

  • Getting distracted while taking a boomerang on the beach, getting splashed by a rogue wave, and having to go back to the room to change my wet leggings. (oops)
  • Taking a class with Debbie Stoller, then teaching her how to make friendship bracelets later that day!

  • Iron Craft Ventura. A.ma.zing. The hosts were hilarious and the crafting was impressive!!! I’m so happy this existed and I was able to witness it.
  • Getting a tattoo. Ok, it was a fake, but the experience was legit…aside from the fact that the tattoo parlor was a hotel room. It started with a shot of bourbon at the door, involved sterilization of the tattoo site, and latex gloves. I’d say that’s pretty legit. (Also, I for real want a scissor tattoo now.) Oh, I should probably mention this was part of Wanderings (see last year’s post for an explanation).
  • Another Headshots session with Sarah Deragon. The lead up to this was a bit of a rollercoaster and I almost ended up canceling the session a few days before. I’m so happy I didn’t. Sarah is a magician and even a bit of a therapist without realizing it.

SabrinaValdiviesi-17


  • My solo Beer Trip. The beer nerd in me was singing as I drove down the highway to Oxnard, and my introvert heart was so happy to enjoy a little bit of quiet time away from the party.
  • Beach House Tacos with Robin. I randomly roomed with Robin last year, and we kept in touch and decided to room together again this year. It was so nice to be able to wrap up our Craftcation experience before heading our separate ways.

The beauty of attending Craftcation as a 2nd timer (or, I would imagine, as a 3rd, 4th, or 5th timer…) is you’ve already gotten the basics under your belt. You know the venue (shoutout to Ventura Beach Marriott!), you know more or less how things run, and chances are this time you know a few people!

For me, my 2nd year gave me a chance to look at the event with more focused eyes. Last year got me fired up to kick my business back into gear. This year I’d had an opportunity to put some of that learning into place and think to myself “what’s next?!” I took advantage of office hours, tried to make new friends (have I mentioned everyone is SO friendly?!), and meet some of the people I was already stalking on Instagram.

(Next year: convince the organizers to make a yearbook so I don’t have to feel so awkward when I creep over to ask “hey, are you @XXXX on Instagram?”)

Have you ever been to Craftcation? If so, what were some of your highlights from 2018?


Dino Planters

I have what one would call a “black thumb”. You know those articles about plants that anyone can keep alive? Yeah, I’ve killed them all.* So it should come as no surprise that I’ve been wanting to get myself an air plant. They’re supposed to be good for indoor air, and they’re impossible to kill.**

The only problem? I’m super cheap. I’ve seen the adorable planters and hanging planters in stores, but I can’t bring myself to spend double digits on them. Plus, I always get the nagging thought “you could totally make that yourself!”

When I finally spotted a couple cute dinosaurs at the Dollar Tree, I knew it was time to make myself a Dino Planter!

Dino Planters - Before

Materials needed:

  • Cute rubber dino. It needs to stand on its own, so no squishy ones. Other figures work too, it doesn’t have to be a dinosaur!
  • Box Cutter (there may be a more elegant/efficient way to do this, but this is what I used.)
  • Spray paint. (any color! make sure it says it’ll adhere to plastic)
  • Pebbles/weights (Optional. to make sure your dino is stable and that your plants won’t drop all the way down)
  • Air Plants. They actually sell these on Amazon and even Target, but if you’re like me and live in South Florida you may be able to find some in the wild. (Might I recomment Matheson Hammock park? It may or may not be where I got mine…)

Dino Planters Materials.JPG

Step 1: Cut an air plant sized hole into the top of your dino. Be careful to cut AWAY from yourself and watch where you have your fingers. You don’t want blood on your dino! You want to have your air plants in hand before doing this, to make sure they’re going to fit nicely. (Leave space for the air plants to “breathe”.)

Some tips: If you’re doing this project with kids….please don’t let them do the cutting! Depending on your dino it could be pretty tough. My technique for making the hole started with some gentle stabbing motions, followed by slicing. (Its must easier to slice through the plastic once you have the cutter in there.)

Dino Planters Cutting.JPG

Step 2: Spray paint your dino. (You know the drill….make sure you’re in a well ventilated area and protect anything in the vicinity that you don’t want painted. Like your grill, for example.) Wait the recommended drying time before handling again.

Step 3: Throw in some of those pebbles/weights into the dino hole. Doesn’t have to be filled all the way, just enough to keep the dino from toppling over.

Step 4: Nestle your air plant into its new home.

Place Air Plant in Dino

And voila! Your dino planter is done!

Dino Planter yellow.gif

*The zizi plant is an excellent suggestion for my fellow black thumbs. I’ve had two that have survived “droughts”, and they even do well in low light situations!

**As I have since learned, air plants need maintenance too….they need to be soaked and then dried every week or so. That sounds manageable, I think…

Dino Planters - after.JPG

Happy National Spaghetti Day!

Did you know today is National Spaghetti Day?

Yeah, I didn’t either…but now that we do know, I wish you a good one!

OLYMPUS DIGITAL CAMERA

What is it, meatball?


To make these cuties all you need is scissors, some felt in white (cream), red, and brown, a little bit of polyfill,  felt glue (for the eyes and mouth), and a needle and thread.

Step 1: Cut 1/4″ strips from the white felt (cream, really) until you have a plateful. I had five 36″ strips. (I used the felt that is sold by the yard, not sheets.)

Step 2: Cut the spaghetti sauce shape out of red felt.

Step 3: Cut 2 circles from the brown felt. Mine were 3″. With a needle and thread make a running stitch along the border of the circle (about 1/8″ from the edge). Place a wad of polyfill in the center, then gather and stitch the opening closed.

To make the eyes I used scraps of white and black felt, but you can also use embroidery!


Bon Appetit!

OLYMPUS DIGITAL CAMERA

Stranger Things Ugly Christmas Sweater

Unless you’ve been living under a rock for the past year, you’ll know that Stranger Things is life! While we could debate whether Season 2 was as good as Season 1 (it wasn’t, sorry), pretty much anyone will agree its a great show. Back in October Target released a line of Stranger Things themed apparel to herald in the new season of the show, including this winning Men’s sweater.

Target Mens Stranger Things Sweater

Ugly? Really?

I’ll be honest, I’ve gotten pretty tired of seeing cool sweaters being called “ugly” just because they look like they were knitted. Now, a tacky, truly ugly sweater? That is a thing to behold…and that is what I would make!

The image came to me right away….red sweatshirt (as big and awkward as I can get), felt Christmas light bulbs, and painted letters.

Supply List:

This project was suprisingly quick and easy. The hardest part was probably fitting all the bulbs onto the shirt.

Step 1: Cut out 26 bulbs out of the felt squares, alternating between pink, blue, green, and yellow. Cut out 26 small rectangles from the grey felt. (I don’t have a template to share for the bulbs, but you can freehand it.)

StrangerThingsSweater_bulbs.jpeg

Step 2: Arrange the bulbs on the sweatshirt in rows. They don’t have to be super straight, or even point in the same direction. Be sure to leave space underneath for the letters, and little bit more for the “string” if you want to make it loopy.

Step 3: Once you have your layout glue the bulbs and the grey caps to the sweatshirt using felt glue. If you really wanted to take it to the next level stitch them on! I think it would add a great touch.

Step 4: Write out that alphabet using the black paint. (Make sure to not get distracted and skip letters. Not that I speak from experience or anything….). Your goal is to have each bulb have a letter underneath. Crazy kindergartner looking letters are encouraged!

20171219_180621.jpg

Step 5: Connect your lights using the green paint. You can use a direct line or you can make it loop. Go crazy! Follow your heart!

StrangerThingsSweater_string.jpeg

Step 6: Step back and admire your work. For 4 hours. Because that’s how long it takes for the paint to dry.

Its rare for my projects to turn out exactly how I envision them, but this one did! Best of all it was easy enough to do in a group, and we were done in a couple hours!

StrangerThingsSweater_finished.jpegStrangerThingsSweater_mysweater.jpeg

Of course, once our ugly sweaters were dry, we couldn’t resist an 80’s inspired group photo….

StrangerChristmas_group photo.jpeg

Stranger Portrait.jpeg

A big thanks to Nabila Verushka for bringing our cheesy 80’s family portrait dreams to life, and for taking all the photos included in this post!

Side note: This sweatshirt is SO comfy and cozy, don’t be surprised if you catch me wearing it during our next cold front!


The return of Be My Clementine!

I’ve been slightly quieter than usual here on the blog these days. Hurricane Irma threw me off just a little bit (thankfully nothing really happened to my house or family), but most importantly I’ve been quietly planning, sewing, and photographing for the official re-launch of my Etsy shop, Be My Clementine!

Be-My-Clementine-square

Be My Clementine specializes in fun, colorful aprons and home goods (such as cloth/reusable napkins, oven mitts, pot holders, makeup/pencil bags), all curated and hand made by me from my home studio. I will also be adding a line of skirts in the near future, so stay tuned! (At the moment I am accepting a limited number of custom orders. Contact me if you’re interested!)

This process has been in motion for over a year, starting with having my logo redesigned by the talented Andrea from Vintage Unicorn, to updating my inventory with new fabrics, to getting my items photographed (which was most definitely the hardest part for me, and what I kept delaying the launch for). I’m excited to be back at it and sharing this with you!

Please be sure to follow my shop on Facebook and Instagram! 

As a thanks to my blog readers I’m also offering a 10% off coupon code valid on ANYTHING on my Etsy page! Click on this link, or use the code SABRINACLEM10